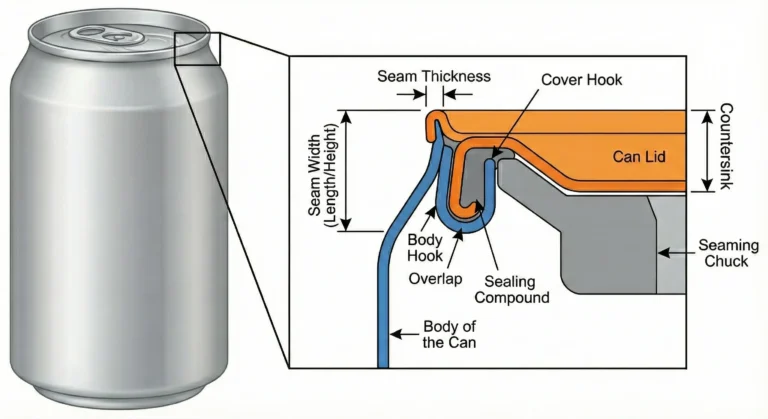
A can’s safety and seal integrity depend on the quality of its double seam. When a seam falls outside the required specifications, the packaging may appear perfectly sealed but develop leaks or failures weeks later. That’s why double seam inspection is an essential part of routine quality control on canning lines. This guide explains how to inspect a can double seam using two methods: a quick visual inspection at the seamer and a destructive seam teardown to measure critical dimensions, including body hook, cover hook, overlap, and tightness.
For a better understanding of how double seams are formed, read our guide to can seaming machines. Here, we focus on the practical inspection and measurement procedures used to evaluate seam quality.
What Is Double Seam Inspection?
Double seam inspection is a routine quality control process used to verify that a can’s closure forms a secure, hermetic seal. It involves two inspection methods: a non-destructive visual examination of can seams sampled from each seaming head during production and a destructive seam teardown. During teardown, inspectors cut open the seam and measure critical parameters, including body hook, cover hook, overlap, and tightness, against the specifications provided by the can and end manufacturer.
For low-acid canned foods produced in the United States, these inspections are subject to regulatory requirements. Under 21 CFR 113.60(a), a qualified inspector must visually examine the top seam of a randomly selected can from each seaming head at intervals not exceeding 30 minutes and document the inspection findings.
Double Seam Inspection: Visual Check vs Teardown
Double seam inspection involves two essential quality control methods, each serving a different purpose. A visual inspection helps identify visible seam defects during canning operations, while a destructive seam teardown allows inspectors to measure internal seam dimensions that cannot be evaluated from the outside. Together, these checks help verify seam integrity and identify potential sealing problems.
Visual Inspection vs. Seam Teardown: Key Differences
Inspection Criteria | Visual Inspection | Teardown Examination |
|---|---|---|
Destructive Testing | No. The can remains suitable for sale if it passes inspection. | Yes. The seam is cut open, and the inspected can is discarded. |
Defects and Measurements | Identifies cutover, sharpness, droop, false seams, skidding, deadheading, and countersink wall damage. | Measures body hook, cover hook, overlap, seam thickness, seam height, and tightness. |
Who Performs It | A qualified operator, closure supervisor, or closure inspector. | A qualified inspector who documents the measurement results. |
Required Inspection Frequency | At intervals not exceeding 30 minutes for each seaming head. | At intervals not exceeding 4 hours, using sufficient samples from each seaming station. |
Additional Requirements | Conducted after machine jams, adjustments, and startup following prolonged shutdowns. | Requires measurements at two different locations around the seam, excluding the side seam. |
Note: The inspection intervals and defect categories listed above are based on 21 CFR 113.60 requirements for low-acid canned foods in the United States. Beverage and non-food can manufacturers may follow similar inspection procedures voluntarily or according to their customers’ quality standards.
Tools for Double Seam Inspection
Accurate double seam inspection requires the right tools to examine seam dimensions, identify defects, and maintain quality control records. The following equipment is commonly used for visual checks and destructive seam teardown:
Seam Micrometer: Measures external seam thickness and height directly on the can, helping inspectors identify dimensional changes between scheduled teardown inspections.
Seam Saw or Cutting Tool: Removes a section of the double seam, allowing inspectors to examine its internal structure without distorting the seam.
Hook Stripper or Pliers: Separates the cover hook from the body hook after cutting, making it possible to inspect and measure individual seam components.
Seam Scope or Optical Projector: Magnifies the cut seam section to measure body hook, cover hook, and overlap without separating the hooks. Regulations recognize both inspection methods, although the required measurements differ slightly.
Digital Seam Scanner: Automates seam measurements and records inspection data, making it particularly useful for production lines operating multiple seaming heads.
Inspection Record Sheets or Software: Documents measurement results for each seaming head and records corrective actions whenever a seam fails to meet specifications.
The Visual Check at the Seamer
A visual double seam inspection begins by selecting one can from each seaming head and carefully examining the entire seam circumference and countersink area. Inspectors should look for visible defects that could affect seam integrity and sealing performance.
The following defects are identified in the regulatory inspection requirements and should be included in the visual inspection checklist:
Cutover or Sharpness: A sharp bend, fracture, or break in the metal along the upper inside edge of the double seam.
Droop: A smooth downward projection extending below the normal seam line, commonly found near the crossover where the side seam passes through.
False Seam: A sealing defect in which the body hook and cover hook fail to interlock, often caused by a bent flange or incorrectly positioned can end.
Skidding or Deadheading: Occurs when the can slips against the seaming chuck, resulting in a section of the seam that has not been completely rolled.
Countersink Wall Damage: Visible marks or damage inside the countersink area that may indicate a worn or damaged seaming chuck.
Record all inspection findings, including the condition of the seam and any defects identified, rather than simply marking the inspection as passed. Detailed records help operators trace when a defect first appeared, identify recurring problems, and provide documentation during quality control audits.
Teardown Procedure: Step-by-Step Guide
A double seam teardown allows inspectors to examine the internal structure of a can seam and verify that its dimensions meet the manufacturer’s specifications. Follow these six steps to complete the inspection.
Collect and Label the Sample
Select a can from the seaming head being inspected. Record the seaming head number, inspection time, product details, and can and end codes. Identifying the seaming head is essential for tracing defects and taking corrective action.
Measure the External Seam Dimensions
Before cutting or disturbing the seam, use a seam micrometer to measure seam thickness and seam height. Measure the countersink depth as well, ensuring that all external dimensions are recorded before teardown.
Cut Two Seam Sections
Using a seam saw or suitable cutting tool, remove two sections from different locations around the can circumference. Avoid the side seam area to obtain representative measurements and identify possible dimensional variations.
Examine the Internal Seam Structure
Inspect the cut sections using a seam scope or optical projector. Alternatively, use a hook stripper to separate the cover hook from the body hook, allowing both components to be measured directly.
Measure the Hooks and Evaluate Overlap
Measure and record the body hook, cover hook, and seam width, then calculate the theoretical overlap. Assess seam tightness by examining the cover hook for wrinkles and determining how completely the metal has been ironed out.
Record Results and Take Corrective Action
Compare all measurements with the can and end manufacturer’s specifications. Document the results for the relevant seaming head and initiate corrective action whenever a measurement falls outside the acceptable limits.
Double Seam Measurements and What They Indicate
Each double seam measurement helps inspectors assess a specific aspect of seam formation and identify potential equipment or setup problems. The table below explains the main measurements and what out-of-specification results may indicate.
Measurement | What It Measures | Possible Causes of Out-of-Specification Results |
|---|---|---|
Seam Thickness | The thickness of the finished seam, measured across the folded metal layers. | Incorrect second-operation roll settings, worn roll profiles, or unsuitable can end or body material thickness. |
Seam Height | The vertical distance from the top to the bottom of the finished seam. | Incorrect first-operation roll settings or improper lifter pressure. |
Body Hook | The length of the can body metal folded inside the double seam. | Incorrect first-operation roll settings, flange width variations, or improper lifter pressure. |
Cover Hook | The length of the can end metal folded into the seam. | First-operation roll profile problems or variations in the can end curl. |
Overlap | The distance over which the body hook and cover hook interlock inside the seam. | Incorrect hook dimensions or other seam formation problems that reduce the mechanical interlock. |
Tightness | The degree to which the cover hook has been ironed out and is free from wrinkles. | Incorrect second-operation roll settings or insufficient rolling pressure. |
Countersink Depth | The distance from the top of the seam to the can end panel. | Worn seaming chucks or a chuck that does not match the can end. |
Overlap and Tightness: Two Critical Factors in Seam Integrity
Overlap and tightness are important indicators of double seam integrity because they help determine whether the body hook and cover hook have formed a secure closure.
Overlap can be calculated using seam measurements rather than measured directly. The theoretical overlap formula is:
Theoretical Overlap = Cover Hook + Body Hook + End Thickness − Seam Width
The calculated overlap can then be compared with the internal seam length to determine the overlap percentage used in can seam quality control.
Tightness, on the other hand, is evaluated through visual examination rather than calculation. After separating the seam, inspectors examine the cover hook for wrinkles. A completely ironed-out cover hook receives a 100% tightness rating, while deeper wrinkles result in lower ratings. Published seam inspection guidance commonly identifies minimum acceptable tightness ratings between 70% and 80%, although the can supplier’s specifications determine the applicable acceptance criteria.
Important for buyers: Seam acceptance limits depend on the specific can body and end combination, not simply on the seaming machine. Even two 202-diameter ends from different manufacturers may have different target dimensions. Always compare inspection results with the specification sheet supplied for the actual can and end being used.
Double Seam Inspection Frequency: Per Head, Not Per Line
Each seaming head operates with its own rolls, chuck, and lifter, meaning individual heads can develop different wear patterns or dimensional variations over time. For this reason, double seam inspection records must be maintained for each seaming head, rather than for the production line as a whole.
For example, a can seaming machine with six heads requires six separate sets of inspection records. This approach helps operators identify which head is producing defective seams and take targeted corrective action.
In routine production, inspection schedules generally include:
Startup Inspection: Check the first cans produced at the beginning of a shift.
Visual Inspection: Examine seams from each seaming head at intervals not exceeding 30 minutes.
Destructive Teardown: Conduct seam teardown examinations at intervals not exceeding four hours.
Additional Inspections: Perform further checks after machine jams, tooling replacements, adjustments, or other events that could affect seam quality.
These inspection intervals reflect the requirements discussed above for low-acid canned food production.
What to Do When a Double Seam Fails Inspection
When a double seam fails inspection, the priority is to identify the affected production, determine the cause, and confirm that the seaming head is operating correctly before restarting.
Hold the Affected Products
Identify and isolate cans produced by the affected seaming head since its last satisfactory inspection. These products should remain on hold until their seam integrity has been evaluated.
Stop the Affected Seaming Head
Remove the defective seaming head from production rather than attempting adjustments while it continues operating.
Identify the Root Cause
Inspect the seaming components before changing machine settings. Problems such as worn or cracked chucks, damaged roll profiles, faulty bearings, or bent can flanges may require mechanical repairs or component replacement rather than pressure adjustments.
Reinspect After Corrective Action
Once the problem has been corrected, run test cans through the seaming head and perform another teardown. Verify that all measurements meet the required specifications before returning the head to production.
Document the Findings
Record the identified defect, its cause, corrective actions taken, verification results, and the final disposition of the affected products.
If the same seaming head repeatedly produces out-of-specification seams, tooling wear may be contributing to the problem. Seaming rolls and chucks require periodic inspection and replacement, particularly on high-volume production lines. A can seaming machine that has processed millions of cans using the same rolls may begin showing wear through changes in seam tightness and other measurements.
Double Seam Inspection on Beverage Canning Lines
Beverage manufacturers use similar double seam inspection procedures, but their production lines face additional challenges, including high operating speeds and internal pressure from carbonated drinks.
A defective seam on a carbonated beverage can may allow gas to escape, resulting in reduced carbonation and compromised product quality. For this reason, many breweries and soft drink manufacturers conduct seam inspections more frequently than the intervals specified for low-acid canned foods.
On integrated filling and seaming lines, seam quality also depends on the condition of the can before it enters the seamer. Overfilling, excessive foam in the headspace, and damaged can flanges during handling can contribute to sealing defects.
This is why beverage can filling and seaming equipment should be evaluated as a complete production system rather than as separate machines.
For more information about selecting filling equipment, see our guide to can filling machine types.
Build Seam Quality Into Your Canning Equipment
Double seam inspection helps manufacturers evaluate the quality of completed seams, while proper machine setup, tooling selection, and preventive maintenance help maintain consistent sealing performance throughout production.
When purchasing can seaming equipment, buyers should confirm which tooling is supplied for their specific can diameter and end type. It is also important to understand how seaming roll and chuck wear will be monitored and what replacement intervals the equipment supplier recommends.
At Foshan Popper, we supply can seaming machines with tooling matched to the can and end specifications used in your production line. We also provide setup support to help ensure that initial seams are properly measured and evaluated rather than assumed to meet requirements.
Before shipment, our machines undergo [confirm: factory acceptance testing process]. Our engineers also provide installation assistance, operator training, and spare tooling support [confirm: after-sales terms and service regions].
Looking for the right can seaming machine? Share your can size, end type, and required production output with our team. We can help you select a suitable seamer and tooling configuration for your application. Request a quotation.
Frequently Asked Questions
How often should double seams be inspected?
Under 21 CFR 113.60, low-acid canned food manufacturers must visually inspect cans from each seaming head at intervals not exceeding 30 minutes. Destructive seam teardown examinations must be performed and recorded at intervals not exceeding four hours. Additional inspections are required after machine jams, adjustments, and startup following prolonged shutdowns.
What is the difference between a visual seam inspection and a teardown?
A visual seam inspection is a non-destructive process used to identify external defects such as cutover, droop, false seams, and skidding. A double seam teardown involves cutting open the seam to measure internal dimensions, including body hook, cover hook, overlap, seam thickness, and tightness. Both methods help verify seam integrity and identify potential sealing problems.
How do you calculate double seam overlap?
Theoretical double seam overlap is calculated by adding the cover hook length, body hook length, and can end thickness, then subtracting the seam width.
Theoretical Overlap = Cover Hook + Body Hook + End Thickness − Seam Width
The calculated value is compared with the internal seam length to determine the overlap percentage. Acceptable overlap limits depend on the specifications provided by the can and end manufacturer.
What is a double seam tightness rating?
A double seam tightness rating indicates how effectively the second seaming operation has flattened wrinkles in the cover hook. A completely wrinkle-free cover hook receives a 100% rating, while deeper wrinkles result in lower ratings. Published seam inspection guidance commonly identifies minimum acceptable ratings between 70% and 80%, although the manufacturer’s specifications determine the required standard.
Can you inspect a double seam without a micrometer?
Yes, a visual inspection can be performed without a micrometer using direct observation or a magnifying tool to identify visible seam defects. However, visual checks alone cannot verify internal dimensions such as body hook, cover hook, or overlap. Accurate teardown measurements require appropriate inspection equipment, such as a seam micrometer, seam scope, or digital seam scanner.
Why must each seaming head be inspected separately?
Each seaming head has its own rolls, chuck, and lifter, which can wear or shift independently during production. A defect affecting one head may not appear on the others. Inspecting and recording results for each head separately helps operators identify equipment-specific problems, maintain consistent seam quality, and take corrective action when necessary.
Final Thoughts
Double seam inspection is a straightforward but essential part of maintaining can sealing quality. Inspect every seaming head, record actual measurements rather than simple pass or fail results, and compare findings against the specifications provided by your can and end supplier. If a seam fails inspection, stop the affected head, identify the cause, and verify the correction before restarting production. Consistent inspections help detect dimensional changes early, reduce sealing defects, and prevent costly product recalls.
If you’re looking for reliable can seaming equipment for your production line, Foshan Popper can help you select a machine suited to your can size, end type, and output requirements. Get a Quote to discuss your production needs with our team.